
Useful tips
Solar panel connection diagram: how to properly connect to the inverter

The solar panel connection diagram determines not only whether the system will work, but also its real efficiency, resource and safety. An error at the stage of connecting the modules to the inverter can reduce the output by 10–30%, cause cable overheating, protection tripping or equipment failure.
For a private house, an apartment with a balcony solar power plant or a small business, the key rule is simple: panels cannot be connected «by eye». You need to take into account the current, voltage, type inverter, line length, conductor cross-section, polarity and presence of protection. That is why the connection solar station does not start with the installation of panels on the roof, but based on the calculation of the entire electrical circuit.
In practice, most problems arise from small things: poor contact in the MC4 connector, incorrect series/parallel connection, too thin cable or lack of DC protection. If you need to buy a cable for solar panels, you should choose not by price, but by permissible voltage, sheath temperature, UV resistance and appropriate cross-section.
A properly assembled system operates stably even in difficult conditions: with a hot roof, a long route to the technical room, or connection via a hybrid inverter with battery. It is this solar panel connection scheme that ensures both generation, human safety, and equipment protection.
Main elements of the scheme and logic of operation
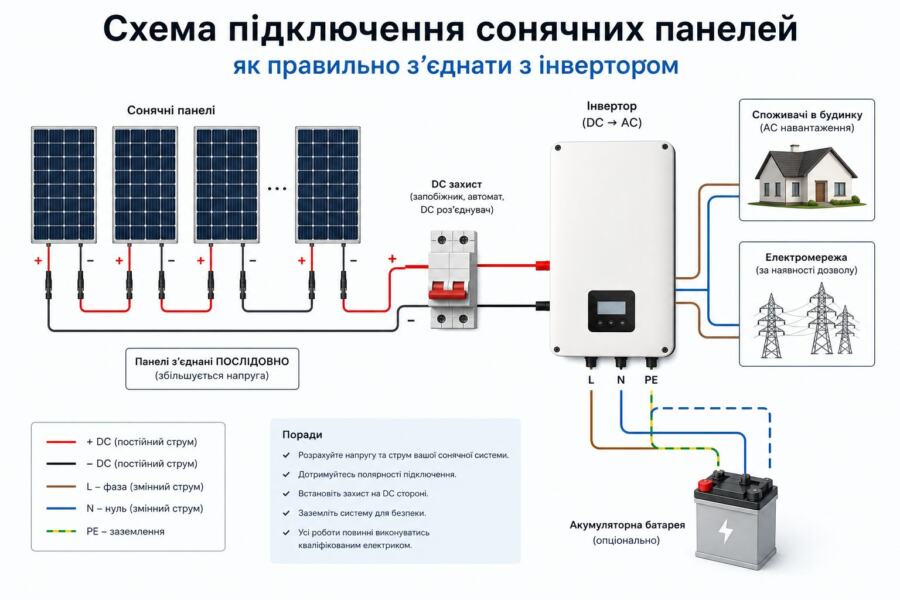
A classic system consists of photovoltaic modules, connecting cables, connectors, DC protection, an inverter and, if necessary, a battery pack. The panels generate direct current, which is fed to the input of the inverter. The inverter converts it into alternating current. 220V for household loads or synchronizes with the network.
There are three basic options for connecting panels: series, parallel and mixed. In series, the voltage is added up, and the current remains approximately the same. In parallel, on the contrary, the current increases, and the voltage remains close to one panel. The mixed scheme is used in large arrays, when it is necessary to simultaneously keep the operating voltage within the MPPT range and limit the current.
For most private facilities, serial chains of 2–6 panels are most often used, and then several such strings are combined through protection. This simplifies installation, reduces cable losses and allows the inverter to operate in the optimal range. In apartment or balcony solutions, the configuration is usually more compact, but the requirements for correct connection are no less stringent.
Marker: solar panel connection diagram should always correspond to the inverter's passport parameters, not approximate estimates. If the maximum DC input voltage is exceeded, the protection may trip instantly, and in the worst case, the power part of the device will be damaged.
How to connect panels to an inverter without errors
They start by checking the technical data of the panels: rated power, Voice — open circuit voltages, Vmp — operating voltage and Isc — short-circuit current. Next, they look at the inverter: maximum DC voltage, MPPT range, and allowable input current. These three parameters determine how many modules can be connected in series and how many rows in parallel.
A typical practical scheme is as follows: the panels are connected via MC4 connectors in a string, then the line goes to a DC circuit breaker or fuse, and then to the inverter. If the system has several strings, it is advisable to install a combiner box or separate input protection for each branch. This simplifies maintenance and allows you to disconnect one circuit without stopping the entire station.
In real installation, it is important not to confuse the polarity. The error "+" and "-" is sometimes not noticeable until the first start, and some inverters react to this with an input failure. Before connecting, be sure to check the voltage with a multimeter. Also, you cannot crimp the connectors with a random tool - you need standard crimpers, otherwise the contact will overheat under load.
For a small homes often choose an inverter with one MPPT channel and two strings at the same lighting level. For a roof with different orientations, it is better to take a model with two MPPTs so that the eastern and western planes do not «pull» each other down. This is what increases the real output and reduces losses due to mismatches.
Cable, connectors and cross-section: what you can't save on
For DC circuits, a special solar cable with double insulation, UV resistance and an operating temperature suitable for outdoor installation is used. If you plan to buy a cable for solar panels, do not take a regular power wire for internal wiring - it quickly ages in the sun and loses mechanical strength.
The cross-section is selected according to the current and length. For short routes, it is often enough 4 mm², but for long lines, higher current or multiple parallel strings it is advisable 6 mm² and more. The main criterion is voltage drop: the longer the cable, the greater the losses. For a small rooftop station, losses in the range of 1–2% are still acceptable, but 4–5% already significantly reduce efficiency.
Connectors must be compatible with each other, factory-type, with reliable fixation. A common mistake is to mix different MC4 series that «visually match» but have different contact geometry. The result is increased contact resistance, local heating and melting in the heat. For the external route, correct laying is also important: without sagging, with fixation through clips, without contact with sharp metal edges.
| Parameter | 4 mm² | 6 mm² |
| Typical scope | Short DC lines | Longer routes, higher current |
| Voltage losses | Lower at short distances | Better for long stretches |
| Heating reserve | Moderate | Higher |
Protection of the solar inverter and the entire DC part
Solar inverter protection — this is not an optional extra, but a mandatory element of any reliable system. On the DC side, DC circuit breakers, fuses, disconnectors, and sometimes a surge protector are installed. SPD. If the facility is located in an area of thunderstorm activity or has long external routes, SPD is critically important.
The practical reason is simple: during a thunderstorm, switching or network failure, impulse overvoltages can occur. They do not always «kill» the inverter immediately, but accumulate microdamage, after which the equipment fails after a few months. Protection is much cheaper than repairing the power module.
Separately, it is worth considering grounding metal structures and panel frames, if required by the project and local installation rules. Another mistake is to place the DC disconnector in an accessible place, but without protection from moisture. For outdoor use, a housing with an appropriate degree of protection is required, and the connections must be sealed.
If the system works with batteries, another safety circuit is added: BMS, fuses on the battery lines and correct charge/discharge logic. The hybrid inverter must be configured for a specific battery type, otherwise the system will operate unstable or reduce the battery life.
Typical errors when connecting a solar station
The most common mistake is incorrect serial connection of panels with exceeding the maximum voltage of the inverter. For example, if you assemble a chain of six modules, and in frost the open-circuit voltage rises above the permissible limit, the inverter may not start or crash. It is necessary to take into account not only the nominal value, but also the winter reserve for Voice.
The second mistake is underestimating the cable length. The owner sees that everything is «working», but does not count the losses. As a result, the station generates less than it could. The third problem is poor installation on the roof: the cables lie on the roof, rub against the metal, heat up and gradually get damaged. After a year or two, this turns into a breakdown of the insulation.
The fourth typical situation is connection without prior measurement. The installer or owner connects the string and immediately feeds it to the inverter. It is more correct to first measure the voltage on the open circuit, check the polarity, and only then perform the final connection. This is a simple action that often saves expensive equipment.
The fifth mistake is buying random components from unverified sellers. For a system where continuous operation and safety are important, it is worth contacting a specialized supplier, for example, the Electro Shop in Dunayivtsi, where you can choose compatible cables, protection, connectors, and auxiliary automation for a specific scheme.
Practical example for home and small business
For a house with a daily consumption of 10–15 kWh, an array is often installed on 3–5 kW. In this case, the panels are connected in two strings, and the inverter is taken with two MPPTs, so that one part of the roof works in the morning, and the other in the afternoon. This is especially useful for complex roof geometry.
For a coffee shop, workshop or small warehouse, the scheme is similar, but the reliability requirements are higher. Here it is important to quickly disconnect the DC part for service, so disconnectors and marking of all lines are mandatory. If the station operates in parallel with the network, it is also necessary to coordinate the protection of the AC side so that a failure in the inverter does not affect the internal wiring of the facility.
In practice, we often see good results when the installation is performed not "at the minimum", but with a margin: high-quality solar cable, correct connectors, normal cross-section, separate protection for each string and strict adherence to the scheme. Such a system does not require constant intervention and works stably for years.
Conclusion: what does the correct connection diagram give?
A competent solar panel connection scheme is a combination of electrical calculation, high-quality components and installation discipline. If the cable, inverter, protection and connection method are correctly selected, the system operates without overheating, losses and accidents.
For a safe and long-lasting result, check the voltage, do not exceed the inverter parameters, use a specialized cable and do not skimp on protection. This is how connecting a solar station becomes not an experiment, but a reliable source of energy for your home or business.